Creamy Avocado Dressing – No Olive Oil or Dairy!


This dressing was a happy accident.  Dinner was almost ready one night, and I realized we didn’t have any olive oil left to make a salad dressing.  So I searched the internet and found a couple basic recipes, combined a few of them, and came up with this.  It’s fantastic.  It’s like a salad on top of a salad, is one of the healthiest, most refreshing dressings I’ve ever put together, and will keep a couple of days, too.  We ended up using it for a dipping sauce for mexican summer rolls for dinner the next day. I really can’t express just how much I love avocados and how they seem to make just about every recipe better.

CREAMY AVOCADO DRESSING (serves 4-6)
– 1 avocado, cut into chunks
– 1/2 english cucumber, chopped
– 1/4 C. cilantro, chopped
– juice of 1/2 lime
– zest of 1/2 lime
– juice of 1/2 lemon
– 1/4 C. water
– kosher salt to taste

1. Cut up the avocado, english cucumber, cilantro, and put into a Food Processor.  Add the lemon & lime juice, lime zest, water, & 1/2 tsp. kosher salt to start.


2. Blend everything really, really well.  Taste, then add more juice, water, salt, etc. to taste.

3. Serve on top of a nice green salad, use as a dipping sauce, etc.  This is a great way to sneak in an extra serving of veggies, too.

Cauliflower Mashed “Potatoes”

These were, in my opinion, the recipe standout during the South Beach Diet craze.  With the inclusion of (small amounts, but still) butter, heavy cream, and a dollop of Boursin cheese, a little richness gets added, but  these still stay much more on the side of “healthy” than traditional mashed potatoes ever would.  I actually think these are better than mashed potatoes – see if you can sneak them in as a substitute and see if anybody notices the difference.

CAULIFLOWER MASHED “POTATOES” – serves 3-4
– 1 large head cauliflower (organic, preferably)
– 1/4 c. heavy cream or half & half
– 1 tbsp. butter
– 2 tbsp Boursin – we use shallot & chive, but any flavor you like will work
– Kosher salt & pepper to taste
– 2-3 bay leaves

1. In a deep pot, boil about 3 inches of water & add a couple of bay leaves.  The bay leaves will infuse the water, and consequently the cauliflower as it steams, with more of a “potato” sort of flavor.


2.  Wash a cauliflower, then cut it into chunky florets.  The easiest way to do this is to cut the cauliflower in quarters, then cut out the middle stem.  The florets should naturally fall away, and you won’t get tons of chopped up pieces of cauliflower all over the counter.


3. Throw the florets in a Colander, then place over (not in) the boiling water, and put a lid over the top of it to keep in the steam.  I’m sure there are (much) fancier ways to steam things, but this is what we’re working with here.

4. Let cauliflower steam for approx. 10 minutes until fork-tender.  Remove the colander from the heat, turn off heat completely, and drain the water.

5. Put the cauliflower back in the drained pot on the same burner you previously used, which is now turned off.  This is my Dad’s trick for getting rid of excess water for mashed potatoes, and it works just as well here.  The leftover heat will kind of zap out any remaining water, which will give you fluffy “potatoes” instead of soggy, watery ones.  Stir the cauliflower pretty well to make sure it doesn’t burn.

6. Add the “extras”.  Heavy cream, butter, boursin.  The remaining heat of the burner will help break these down and combine them.  Mix this all together, then remove from the burner.

7. With an Immersion Blender – I’m amazed by how often I use this in cooking – blend this all together, really really well to achieve your desired consistency.  Taste, then add seasonings – I typically start with 1/2 tsp. kosher salt and a couple of grinds of black pepper,  stir & taste, then adjust again.

8. Serve immediately, or refrigerate leftovers up to 2 days.

Shaved Cauliflower & Radicchio Salad with Honey-Toasted Walnuts & a Meyer Lemon Vinaigrette

Did you need something super healthy and fresh to kind of ease you back into a week following the over-indulgence of Super Bowl weekend?  I did.  I also got to use one of B’s Christmas gifts to me for the first time, this ridiculous Cuisinart Food Processor, which made making this salad a 10 minute process instead of maybe a 20 minute one.  Shaving the cauliflower and radicchio into paper-thin slices really “takes this salad from a meal to an event” (we do the same thing with the radishes and avocado for our Favorite Salad Ever), so a julienne will work just as well if you don’t have a food processor that will accomplish this.  You can also just shave these into thin slices with a really sharp knife.  This salad is so pretty and crunchy, the dressing gives it a little lift of sweetness, and the honey-kosher salt toasted walnuts finish it perfectly.  It also makes a ton of it (this would be great for parties), so I just kept the salad and the dressing separate so we could combine them when we were ready to have this over the next day or so.  A paper towel in the bowl with your salad will keep the ingredients from getting soggy.


SHAVED CAULIFLOWER & RADICCHIO SALAD WITH HONEY-TOASTED WALNUTS & A MEYER LEMON VINAIGRETTE (makes a really big bowl of salad – adapted almost exactly from the lovely Happy Yolks)
– 1/2 a head of cauliflower (not cored)
– 1 head radicchio, cored
– 4-5 celery stalks, with leaves
– 1/4 c. chopped fresh parsley
– 1/2 c. honey-toasted walnuts
– 1-2 tbsp honey
– 3 meyer lemons, juiced
– 1 tbsp. dijon mustard
– 1/4 c. EVOO
– kosher salt & fresh ground black pepper

1. Cut a head of cauliflower in half, then shave it either with a julienne, a food processor, or a very sharp knife. Include the stem of the cauliflower. Throw this all into a big bowl.


2. Core a head of radicchio, and shave that as well. Do the same with the celery sticks, and also roughly tear  the celery leaves.  Add to the bowl. Chop the chives and the parsley, add to the ingredients, and stir everything to combine.


3. For the meyer lemon vinaigrette, juice the lemons, then add (in this order, to help it all blend together) kosher salt, pepper, dijon mustard.  Whisk together (or shake it up, if you’re using a little mason jar), then add the olive oil. Whisk or shake it to combine, then add to the salad (or keep separate if you’re planning to eat this over the next day or so, too).

3. To make the walnuts, drizzle them with honey and then sprinkle lightly with kosher salt.  Bake for approx. ten minutes at 350.  Remove, let cool slightly, then top the salad with these.  Serve and enjoy.


Four-Ingredient Fruit Snacks

There have been a bunch of recipes for fruit snacks on Pinterest popping up in my news feed lately, and blueberries were on sale at Wegman’s, and we’re always looking for snack alternatives to our beloved hummus and Pretzel Chips. So….fruit snacks it is! As someone who likes to know what we’re consuming, and where it comes from, the fact that there were 4 ingredients in this, total, was really appealing. Organic blueberries, local organic honey, and lovely Meyer Lemons make up for the fact that these include gelatin.  Let’s just think of the detoxifying benefits of the lemons cancelling that right out, though!

HOMEMADE FRUIT SNACKS (makes approx. 2.5 cups)
– 1.5 cups blueberries (or your choice of berry)
– 3/4 cup meyer lemon juice (approx. 4-5 meyer lemons) These are a cross between a clementine & a lemon (a friend of mine calls them “lemontines”), which makes the recipe sweeter, and better, than the sourness of traditional lemons
– 2 tbsp. honey
– 2 tbsp. gelatin

1. Wash the blueberries, juice the lemons, then combine in a saucepan over medium heat until the berries start to soften.


2. Remove from heat and let cool approx. 5 minutes.


3. Puree – ideally with an Immersion Blender – or in a blender.  Strain to remove the blueberry skins.  A lot of these will just come up with the immersion blender, so if that’s good enough for you it’s good enough for me (it was).

4. Add honey, stir to combine.  Taste at this point – what it tastes like now is what it’ll taste like when it sets, so modify the recipe as needed.  More honey, more juice, etc. 

5. Whisk in gelatin a tiny bit at a time, until fully incorporated.

6.  Pour mixture into an ungreased shallow glass dish, and refrigerate for approx. 45 minutes until set.  


7. Cut them into whatever shapes you like, remove from the glass dish, dust with a tiny bit of cornstarch to prevent them from sticking together, and store in a tupperware container (in the fridge) to enjoy.  These had kind of a jello jiggler texture, which we liked, but if you want them to be more of a traditional “fruit snack” texture, I’d add maybe 2 more tbsps. of gelatin.

Avocado Chicken Salad – No Mayo!


In the last post I mentioned that I’ve made some of my favorite chicken salads with avocado as a substitute for mayo, so I thought I would post that recipe this time around.  This, again, is a super easy recipe – very light and flavorful, and really healthy too.  It’ll keep for a day or two, but it’ll probably be gone before then!

AVOCADO CHICKEN SALAD (makes approx. 2 servings)
– Shredded cooked chicken, approx. 2 cups
– 1 avocado, cubed
– juice of 1 lime (a Rosle Citrus Reamer works great for this)  
– 1 tbsp. cilantro, roughly chopped
– 2 scallions, chopped

1. Cut an avocado in half, remove the pit, and dice it.  Add to a bowl and mash roughly with a fork to break it up a bit.


2. Once the avocado is mashed, add the cilantro, lime juice, scallions, and kosher salt/pepper (a pinch of each to start – then add more to taste).  You want to kind of make a guacamole base, and then add the chicken to it. 


3. Add the shredded chicken to the mix, then stir to combine.


4. Taste, season, then taste again.  Delicious!

Chickpea, Avocado, & Feta “Smash”


I felt like Maria von Trapp making this, because: Chickpeas? Avocados? Feta? These are a few of my favorite things…

Avocado is a great substitute for mayo – I’ve made some of my favorite chicken salads with avocados as a base – but mashed with chickpeas, combined with a little feta, lemon/lime juice, and cilantro, this was beyond delicious.  The citrus keeps the avocado from browning, so you can keep this for a full day in the fridge for a healthy snack, or a sandwich filler, or a scoop on top of some salad greens.  You get the picture. It’s healthy, it’s filling, and it’s ready in no more than ten minutes, tops.  Enjoy.

CHICKPEA, AVOCADO, & FETA “SMASH” (serves 2-3)  
– 1 can chickpeas, rinsed and drained (I use Eden Organic beans, because they’re fully organic, their cans are BPA-free, and they’re only slightly more expensive but significantly better for you than the alternatives) 

– 1 avocado, cut into chunks
– 1/2 lemon, juiced
– 1/2 lime, juiced
– Approx. 3 tbsp. crumbled feta
– smallish handful of cilantro, chopped (approx. 2 tbsps)
– kosher salt and freshly ground black pepper


1. Rinse the chickpeas well and drain them, then add to a mixing bowl.

2. Cut an avocado into chunks. The easiest way to do this is to cut an avocado in half, lengthwise:  

Then, carefully but firmly, thunk (that’s a made-up cooking term) the knife blade into the avocado pit, twist it a bit, and gently pull out the pit. 
those are some balancing skills, right there!


Then, in the avocado half itself, cut the avocado into a grid, run your knife around the perimeter of the avocado, and squeeze out the chunks into the bowl with the chickpeas:

2. Combine the chickpeas and the avocado, lemon/lime juice, and kosher salt & pepper, and smash it all together.  If you have a Potato Masher, this helps to get things started, but finishing smashing with a fork until you have the chickpea/avocado consistency that you want.  If you want more of a chunkier avocado texture, smash the chickpeas until they’re 75% to the texture you want, then add the avocado to finish. Say smash again.  Smash!!
pre-smash


smashed
3. Add cilantro to taste, then feta, then add salt/pepper/lemon juice or lime juice as needed.


Sandwich filler?  Salad topper? Solo?  Any way (or “S”) you serve it, it’s a winner.

To follow me on Facebook, click here: And What I Ate Facebook Page 

Zucchini, Shallot, & Chicken Sausage “Pie” – No Crust


Sometimes I wish zucchini season would last all year long. There are so many things you can use it as a base for – it’s one of my most-used ingredients.

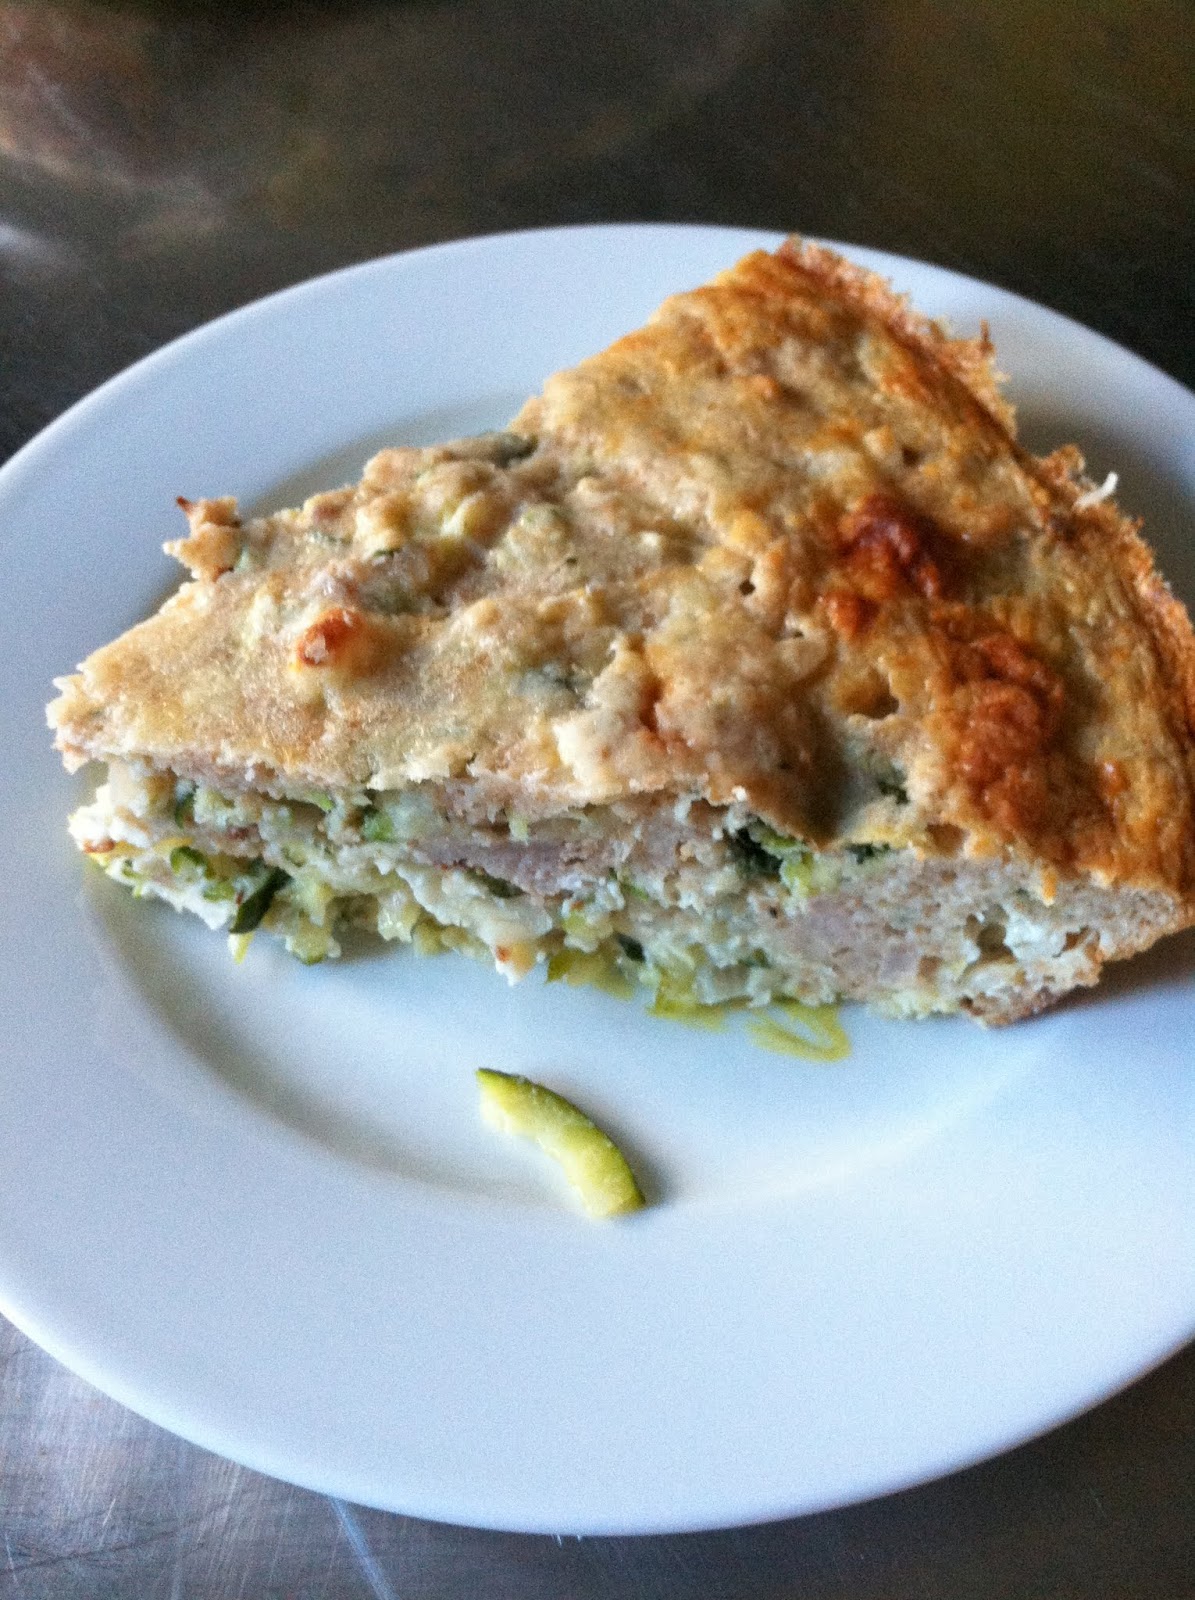
This zucchini “pie” has a base of shredded and drained zucchini, shallots – which soften and release a lovely little flavor during cooking – and cooked chicken sausage. I added some wilted spinach and a combo of mozzarella and feta to this, then topped it with a really thin whole wheat mixture to bind it a little bit. It cooks well, keeps well, and is incredibly filling. You can opt out of the chicken sausage if you want to keep this completely vegetarian – it’s just as good.

ZUCCHINI, SHALLOT, & CHICKEN SAUSAGE “PIE” (adapted from Skinny Taste)
– 2 medium zucchini, washed and shredded. Save the ends and slice about 20 very thin rounds to use as a base layer.
– 2/3 c. shallots, sliced thinly
– 1 c. chicken sausage, uncooked
– 1 c. baby spinach leaves
– 1/2 c. shredded mozzarella
– 1/4 c. crumbled feta
– 2/3 c. whole wheat pastry flour
– 1 tsp. baking powder
– 2/3 c. milk
– 1 tsp. olive oil
– 2 large eggs – 1 white & yolk, 1 white
– 1/2 tsp. kosher salt

1. Preheat oven to 400.

2. Shred the zucchini, and drain it really well. I’ve found the best way to do this is to really wring it out in cheesecloth, which can be found everywhere from grocery stores to Bed, Bath, & Beyond.  Make sure you get as much water out as possible, so the zucchini pie won’t be a zucchini mess. Add drained zucchini to a bowl. 


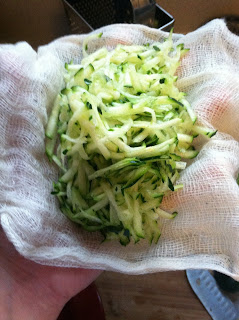
3. Put the zucchini rounds on a baking sheet over a paper towel. Sprinkle with kosher salt, let sit for ten minutes, and then flip the rounds, sprinkle with salt again, and let sit for another 10 minutes. This will extract the water from the zucchini. After salting both sides, rinse zucchini rounds and dry well.


4. Meanwhile, brown sausage in a pan. When cooked, add spinach, remove from heat, and combine until spinach is wilted. Let cool a bit.

5. Chop the shallots, shred the mozzarella, and add to the shredded zucchini.  Add feta, then add sausage/spinach mixture. Mix well to combine.


6. Whisk together flour and baking powder in a separate bowl. Add milk, olive oil, salt, & eggs to this mixture, and combine. It will be pretty thin – this is good.

7. Spray a pie pan with cooking spray or olive oil.  Make a layer of the zucchini rounds, overlapping each other, for your zucchini pie base.


8. Add the zucchini/shallot/sausage/cheese mixture and spread evenly into the pan.


9. Pour the “batter” mixture evenly over the zucchini mixture.  You can sort of bang the edges or bottom of the pie pan to get the batter into the crevices of the pie, so it will bind it more.

topped with the batter & dusting of parm, right before going into the oven

10. Top with a dusting of freshly grated parmesan cheese, and bake for approx. 30 – 35 minutes, or until a knife can be inserted and removed cleanly from the center of the pie.  Let stand for 15 minutes, then slice and serve. 


Healthy Pumpkin Muffins with Walnuts & Chocolate Chips or Raisins


October and November are the 2 months out of the year that I cook with pumpkin at all. Canned pumpkin pops up (and disappears quickly) during this time, and while I know there’s a lot you can make with it, pumpkin muffins are my go-to for fall.

Pumpkin is loaded with fiber, and walnuts (and dark chocolate!) have heart-healthy fats and benefits. Whole wheat flour keep these muffins on the “good for you” side of things, and while there’s a cup of (organic) sugar in this recipe, there isn’t any oil or “traditional” baking fats. These pumpkin muffins stay moist and flavorful due to the pumpkin puree and greek honey yogurt, and they’re delicious. I made 6 large pumpkin-walnut-chocolate chip muffins and 6 large pumpkin-walnut raisin muffins by splitting the batter at the very end and mixing in the raisins and chocolate chips separately. This is the second batch I’ve made this week – they go fast!

HEALTHY PUMPKIN MUFFINS WITH WALNUTS & CHOCOLATE CHIPS OR RAISINS (makes 12 large muffins)
– 1 1/3 c. Libby’s pumpkin puree, or similar. Make sure you get pureed pumpkin, not pumpkin pie mix.
– 2 egg whites
– 1/2 c. greek honey yogurt (Noosa, if you can find it, because it’s the best greek yogurt on the market)
– 1 c. sugar – organic, if you can find it
– 1/2 tsp. pure vanilla extract
– 1 1/2 c. whole wheat pastry flour, or all purpose flour
– 1 tsp. ground cinnamon
– 1/2 tsp. ground ginger
– 1/2 tsp. ground nutmeg
– 3/4 tsp. salt
– 1/2 tsp. baking soda
– 1/2 c. chopped walnuts (optional)
– 1/4 c. chocolate chips (optional)
– 1/4 c. raisins (optional)

1. Preheat the oven to 350.

2. In a large bowl, combine the pumpkin, egg whites, honey yogurt, sugar, and vanilla. Stir with a whisk to combine.


3. In a separate bowl, combine the flour, cinnamon, ginger, nutmeg, salt, baking soda, and whisk to combine.


4. Add the flour mixture to the pumpkin mixture a little at a time, stirring until just combined. Add walnuts (if using) and fold into the mixture.


5. At this point, either divide the batter & walnut mixture into two bowls, and add 1/4 c. of chocolate chips to one bowl, and 1/4 c. of raisins to the other bowl to make 2 different kinds of muffins, or keep the batter mixture in one bowl and just add 1/2 c. chocolate chips or 1/2 c. raisins to the mixture. Combine, being careful not to overmix.

6. Spray a muffin tin with cooking spray, and spoon equal amounts of the batter into the muffin tins.


7. Bake for 20 – 25 minutes or until a knife can be inserted and removed cleanly. Don’t overbake, or muffins will get hard.  Let cool and enjoy.


Roasted Red Beet, White Bean and Sage “Hummus”


On our way up to Good Commons, one of the snacks they stocked “The Good Bus” with was an incredibly tasty beet and white bean dip. They served it with parsnip sticks, which were crunchy and a little spicy, but I was so surprised by how good this dip was that I knew I had to try and copy it when I got home.

I’ve really tried to incorporate beets into my diet – especially after reading about how beet juice was making the rounds in this summer’s Olympic Village as a natural performance enhancer – but sometimes I just can’t get past the “earthy” (read: dirty) taste they can have.  Roasting them makes them a little sweeter, and the addition of sage lightens the whole dip. I tried to copy this completely by serving it with the parsnip “sticks”, but we went back to old faithful, the pretzel chip.  Celery would be really nice with this too. If you have kids, I’m sure they’d go crazy over the fact that this dip is pink, since it was a cool little detail even for the over 30 crowd (ahem).

ROASTED BEET, WHITE BEAN, AND SAGE “HUMMUS” (adapted from Weelicious)
– 1 small beet, cleaned but unpeeled
– 2 cloves garlic, unpeeled
– 1 15 oz. can white beans, rinsed and drained
– 10 fresh sage leaves, chopped
– 1 tbsp. lemon
– 1/4 c. EVOO

1. Heat your oven to 400.

2. Place washed beet and garlic cloves in a little pouch of aluminum foil.  You want to make sure it’s tightly closed, but also has some space so that air can circulate and the flavors can roast together. Bake for approx. 45 minutes.

3. Remove the pouch from the oven – carefully, some of the beet juice spilled out of mine and it was a MESS – and remove the skin from the beet. Again, beets are messy and will stain just about everything, including your hands.  Either wear disposable gloves when peeling the skin (which should slide right off after the beet is roasted) or use a paper towel to kind of scrub it off. Chop beet roughly, and add to a larger bowl.


4. Remove the skin from the garlic cloves and toss into the bowl with the beets. Add chopped sage, lemon juice, and olive oil, then put the whole mixture into a food processor.


5. Combine in the food processor until smooth. Add kosher salt to taste, then serve “hummus” with celery, carrots, pretzel chips, or parsnip sticks.

Sorry, parsnips. You’re pretty. I tried.


Baked Kale Chips


Kale packs a ton of vitamins into your diet, and on top of that, it contains antioxidants, anti-imflammatory nutrients, and anti-cancer nutrients. There is a ton of kale available at the farmers’ market right now, so I decided to get Brad to try kale chips as an alternative to the bag of pretzel chips we eat on a weekly basis. These kale “chips” look kind of unusual, but are really delicious, healthy, and a great alternative snack. They’ll keep for a couple of days in an airtight container, but odds are they’ll be gone before then!

BAKED KALE CHIPS
– 1 head of kale, “ribs” removed, torn into chip-size pieces
– olive oil (2 tbsp, approx.)
– heavy pinch kosher salt, or Herbamare, or garlic powder

1. Preheat oven to 300.

2. Thoroughly wash the kale, then remove “ribs” and tear into chip-size pieces.
gorgeous kale from the farmers’ market!


3. In a bowl, toss kale with 2 glugs olive oil, massaging onto the kale to make sure each piece is coated. Add seasonings (kosher salt, herbamare, garlic powder, etc.). The flavors will concentrate somewhat when you bake the chips, so add a little less than what you otherwise would.


4. Spread kale chips into a single layer on a parchment paper-lined baking sheet.  Bake at 300 for 20 minutes. I’ve read about kale chips being bitter, but I think the key is not to overcook them – like, at all. 20 minutes at 300 will work for most ovens.


5. Let cool and enjoy!